Evaluation of
Enterprise Output Manager from Unisys
Enterprise Output Manger
(E.O.M.) is a very powerful, versatile product with tremendous functionality, and
use is only limited by your imagination. It is a Client Server product that
runs on a PC platform under a Windows Professional Edition or higher. You can
install the Client on as many PC’s as you wish, but for the purpose of this
Evaluation it is desirable to install it on the same PC as the Service
(application). E.O.M. has evolved over the last 19 years from the days when the
product accepted ASCII text data from Mainframes (Servers) and printed it out
on attached Line printers, or Dot Matrix printers, to where we are today,
printing graphical output to Inkjet, and Laser printers located anywhere in the
world via Intranet or Internet. It also Emails pdf files like invoices direct
to your customers. It will continue to be developed to meet your output needs
of the future.
This document has a number
of references to EOM 9.1. Just read EOM 10.0, 11.0 or 12.0. EOM 10.0,11.0 and
12.0 have some added new features over 9.1. The two zip files are for EOM 9.1
and EOM 10.0, 11.0, and 12.0
You may like to view the
YouTube video clip below. It’s a high level overview of this product.
http://www.youtube.com/watch?v=KOAfZzYFbIw
Thank you for downloading
this Evaluation copy and taking the time to evaluate this product. We know that
you will be surprised by what you can do with this product and how easy it is
to use.
The Evaluation process can
be broken down to five phases.
Phase 1: Installation.
To
install this product you will need to have Administrator rights on the PC that
you are installing this product. By default the Client will run under this
Username. If you try to run the Client under a different Username then it will
not connect to the Service unless this new Username is set up in the Windows
(E.O.M.) Output Manager Administrator group. For more information refer to the
Online Help Manual.
Go
to the Folder that you downloaded the Evaluation copy to. Unzip the files. In
the directory
Output Manager Enterprise Edition 10.0, or 11.0, or 12.0 Evaluation Edition CD,
double click on Setup.exe. After a
short wait you should see E.O.M. Install window come up as per below.
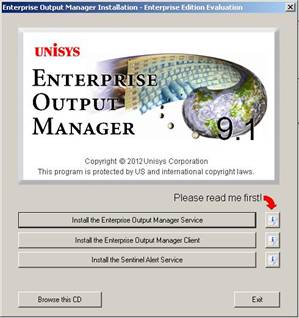
Click
on Install the “Enterprise Output Manager Service”. Just go with the defaults
if you can. This should not be a problem if the software can be installed under
C:\Program Files\- .
At
the end of the install you will be asked if you want to read the information on
setting up the Service, and the Windows Service management window will be
opened so that you can set up the Service. At this stage take the default
settings. Later you could change the Service to run under a specific Username.
Now start the Service.
Install
the Enterprise Output Manager Client by clicking on that button. Take the
defaults for this also.
Finally
click on Install Sentinel Alert Service. This software can send you Email
messages, Texts to your cellphone and/or make an Alert Warning light flash,
should E.O.M. encounter some kind of error that you have defined and wish to be
alerted to. For more information refer to the Online Help manual.
All
being well you now have installed all three pieces of software.
Start
up the E.O.M. client. You will be asked to connect to a Server as below:-
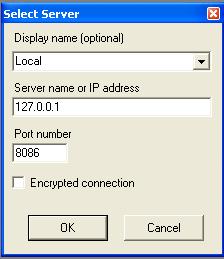
In
display name enter a descriptive name. In Server name or IP address enter the
name or address of the PC that you installed the E.O.M. service on. Do not
change the Port number or set Encrypted connection at this stage. These are
just two options you may wish to use in the future.
If
you cannot connect then you will have to Logoff and Logon again, or reboot the
PC. This is due to Windows not recognizing that a new User Group has been set
up for E.O.M. If it does connect then you should see a screen similar to below,
but there will be no Management Windows shown.

Click
on those Icons at the top below the Menu bar and you should be able get the
screen as below. The Icons that have been clicked on appear as if they have
been pressed.
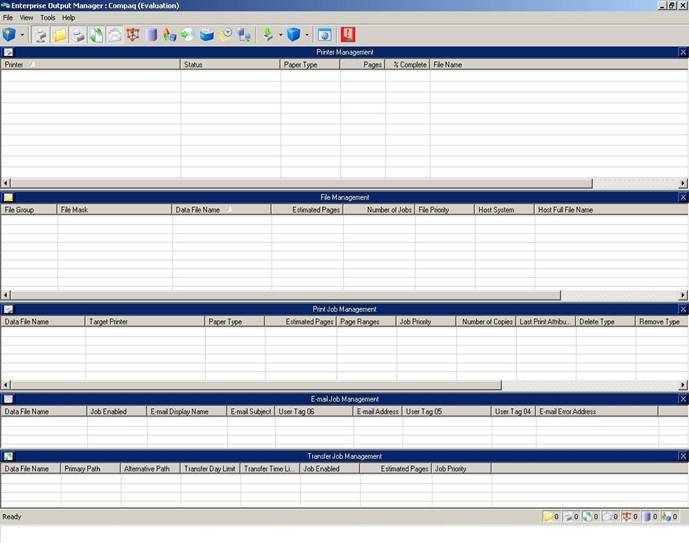
These
are some of the E.O.M. Management Windows within E.O.M. and allow you to
monitor the status and activities going on in E.O.M. As you can see we have no
Printers declared or any data or print files being handled. All files coming
into E.O.M. will appear in the File
Management window. All declared printers and their status will appear in
the Printer Management window.
The
same goes for the other E.O.M. management windows. For more information refer
to the On Line Help manual.
Now
you have to set up a Folder and subfolder of -\Demo\MonitorDirectory\ under the
\Enterprise Output Manager\ directory. When this is done you can import a small
E.O.M. configuration which will allow you to get into the demonstration phase
of this product. Click on the link below to pull down a .zip file that contains
this Demo configuration. This file contains three input text Demo files and an
.xml configuration file to be imported into E.O.M. Below is also a link to a
YouTube Video taking you through the Import and set up process.
www.wantitconsulting.co.nz/EOM_Eval_9_1.zip
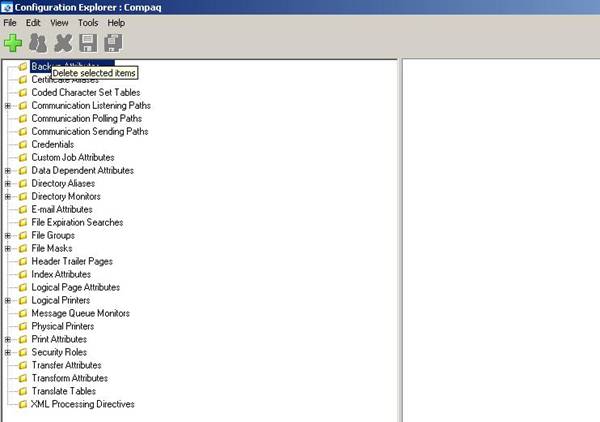
To
import the .xml configuration file, go back to Enterprise Output Manager and click
on Tools\Configuration Explorer. When Configuration Explorer comes up,click on
File\Import Export. On the right hand side set the Type of file to access as XML. Then point it to
-\UpdatedEvaluationConfig.xml, then click on Import All , then click on
File\Save all items. If the save is successful you should see Ready at the bottom left hand side of
the Configuration Explorer window.
Phase II: Getting set up to run the demonstration.
The
product as now installed has three print configurations set up. DEMO1, DEMO1a,
and DEMO1b. The output of all three is the same but the inputs are quite
different in format, even though the actual data information is the same. All
three print out on blank paper but use an electronic form. The input data to be
used for these demonstrations can be found in the folder named
-\EOM_Eval_9_1_Setup\, which you loaded down in that zip file.
The
electronic form is a Windows Meta File, which can be produced by a number of
drawing applications, like MS Power Point, and Open Office Org.Impress. For
Demo1 and Demo1a E.O.M. prints the form out on the blank paper then prints out
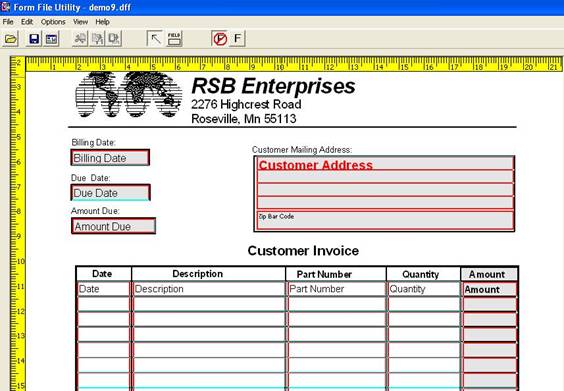
the data by X and Y coordinates. For Demo1b the Form and data are printed using
a special E.O.M. forms definition file, named Demo9.dff. This file contains the
Windows Meta File and all the coordinate positions for the data. This special
forms file was created by the E.O.M. Forms File Utility program. Below is what
this form looks like when it is being built. Each field on the form has a
unique name. You can have single fields and one and two dimensional tables. In
this example there are some single fields and some one dimensional tables.
These forms file are normally located in the \PrntCtrl\ directory.
Now
to install a Windows printer in E.O.M. To do this we go to E.O.M. Configuration
Explorer and configure a printer, and Map it to a Windows printer that can be
seen by this PC. This could be a directly connected printer or a network
attached printer. E.O.M. for this purpose can be considered to be a normal
windows program like Word or Excel that wants to print to a Windows printer.
To
start Configuration Explorer go to the Menu Bar and click on Tools and select Configuration Explorer.
A
new Application window should appear as below:-
Click
on Physical Printers, then Click on the green plus sign, which will bring up
the Add new Physical Printer window. This
is where we declare the attributes for this printer and Map it to a Windows
printer on the desktop.
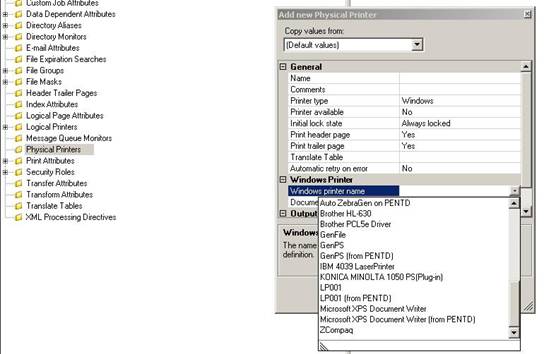
In
this example I have clicked on the Windows Printer name, Drop down menu, to a
list of printers that are available to E.O.M. Just click on the one you want to
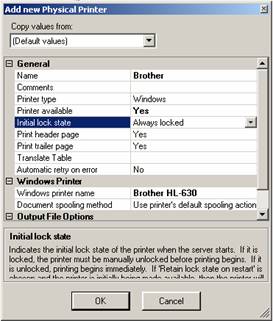
wish to use during this evaluation. Under Name give it a descriptive name.
Under Printer available click Yes and under Initial lock state you can also click on Always unlocked. This is a choice, because sometimes to maintain
control you may always wish that printer to up Locked when E.O.M. starts.
However you can unlock it on the E.O.M. Printer
Management window by right clicking on the printer and selecting, Unlock.
The other settings on that Add new Physical Printer window can be left as they
are. At any time you can select a field on a configuration window and push F1,
and you will get some Help information on that field. I have added a printer
named Brother, as shown below.
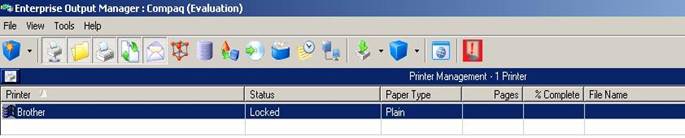
Now
click on OK to add printer and click on Save all modified items, the double
floppy disk Icon at top on page. Now go back to the Enterprise Output manager
Client and you should now see that you have a Printer and its status is Locked
or Unlocked, depending on your setting.
Summary: We have now installed all the software
needed. We have configured in a Windows printer to print to. Now to actually do
some printing.
Phase III: Print demonstration.
With
E.O.M. you can send the print file into it using the LPR/LPD, HTTP, Raw TCP/IP
or the Output Manager protocol. However you can also print a file manually by
you using E.O.M. to select a print file from a directory and print it to a
printer via an E.O.M. Print Attribute. Initially we will use the manual method,
then, we will look at how it worked. To do this go to the E.O.M. Window and
click on the Blue box at the top left hand corner and select Create Print Job. You should see
something like below. The highlight fields are data that I selected from the
various drop down menus.

The
demo1.txt file is one of the input data files supplied in that directory
-\EOM_Eval_9_1_Setup\-. Click in the File Path entry box and you should get a
Drop Down box, which will allow you to select a file to print. Select the
demo1.txt file for input from the \ EOM_Eval_9_1_Setup \ folder, select File
Group 1Day (this tells E.O.M. to keep that file in its database for 1 day after
it has printed, this is so you can reprint it without have to get the file
again from the folder or from the application), select Print Attribute DEMO1(this tells E.O.M. what printer
attributes you want set up in the Windows driver, like paper size, margins
etc), then select the printer you wish to print to. Click on OK and you should
see the output print queued on the printer if it is locked, else it should have
printed out on you printer. If your printer is Locked, right click on it and
select Unlock. It should then print and look like example below.
Now
follow the same procedure and print out demo1a,
and demo1b. The results should be
very similar.
Use
WordPad or Notepad to look at the three input files. You will notice that demo1a is similar to demo1 except that there is a 5
character line type identifier at the start of each line. If you look at demo1b you will see that is similar to demo1a except that only data to be
printed is there and that the fields are all terminated with a tilde ~
character. It could have been a , (comma) but in this case we chose the ~
character as it is not likely to turn up in descriptive data. You will also
notice that line 1 is a little different in that is has an E.O.M. control line
at the start. This is called the $DEPHDR$ line and can have up to ten control
parameters that can be passed to E.O.M. These parameters are called Usertag1
thru Usertag10. They are very useful when building the Masks and for passing
specific parameters into E.O.M. For example you could pass in an Email address,
Email subject etc. For more information refer to the Online Help Manual.
Now
lets remove those three entries from E.O.M. To do this you mark and bound the
three entries in the file manager window and right click on the, select Remove,
then check Remove all without further
confirmation. Rather than Mark & Bound you could have right clicked on a
file and selected Select All, then
Remove.
Now
to demonstrate one of ways of getting data files to print through E.O.M. When
files are sent into E.O.M. they all come in through a File Mask, and when a
Mask condition is meet, E.O.M. will perform the task set up for that particular
Mask. It could be one or up to six job types available. Those six are Create :-
Print Job, Transfer Job, Email Job, Custom Job, Backup Job, Transform Job. We
will just cover the Print Job.
This
time we will use the E.O.M. Directory Monitor function to bring a print file
into E.O.M. If you now go to Configuration Explorer (In the E.O.M. menu click
on Tools, Configuration Explorer or this Job Windows may already be open and
shown on Task Bar, in which case just click on the Icon on the Task Bar). In
the Folder list you will see Directory Monitors, expand that and you will see a
Directory Monitor Attribute named MonitorDemoInputDirectory.
You will notice that it is pointing to a directory, which was set up during the
install of E.O.M.

Notice
that the File discovery method has been set to Immediate detection. You can
change that to a time period if you wish. You will also notice that there is a
filter you can use. The * is the old MS DOS wild card character. The setting
here indicate that any file that appears in that directory will be bought in
and processed by E.O.M.
For
this exercise could you copy the demo1.txt file from folder
-\EOM_Eval_9_1_Setup\ to the folder that E.O.M. is monitoring
-\MonitorDirectory\-. This should be picked up by E.O.M. and printed to a
printer named DEFAULT. This is a logical printer that has not been mapped to a
physical printer yet. To see what the output would have been like you can use
the Print Preview method. Double
click on an entry in the File Management or Print Management window. From this
window you can create a print job to print the output to your printer. To do
this go to File, in the menu and click on the drop down entry Create a Print Job. Click on the
printer name entry box and in the drop down menu, select your printer and click
OK.
In
the File Management window you will notice that these jobs all came in through
different File Masks entries.
You
might like to go back to Configuration Explorer and look at the File Group, and
File Mask Entries and work out how E.O.M. handled these files. We will cover
this later.
Phase IV: Prints files coming in from a real
application.
For
this exercise we are going to send two print files, demo1a, and demo1b from
Microsoft WordPad to a Windows Generic/Text only printer that will send the
data file into E.O.M. To do this we must first set up the Generic/Text printer.
Depending
on your Windows operating system the set up may vary a bit from what is
described here. However the concept is you have a Windows Generic/Text only
printer that communicates via a LPR/LPD port to the PC that E.O.M. is running
on. This means that you cannot have Unix printing allowed on this PC as it will
have grabbed port 515.
Go
to Windows printers and add a printer. Select local attached printer, use LPT1,
use Generic/Text Only print driver, keep existing Driver (if given that
option), name printer LP001, default printer set No, Shared printer set No (but
may have to be Yes depending on how you want to print to this printer, a MS DOS
program would need it to be Shared, a .bat script requires it to be yes). Click
Finish. Now you have to add a LPR/LPD Port for the printer to use to connect to
E.O.M.
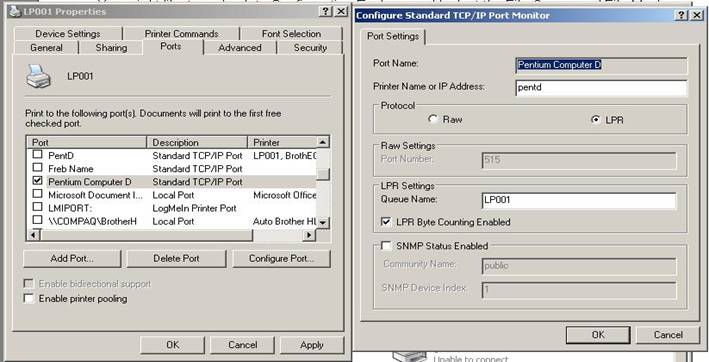
While
in Windows Printers go Server Properties, Ports, Add a Port, Standard TCP/IP
port (or LPR/LPD port if that option is available), Printer Name or IP address
(enter PC name of PC IP address), Port Name (perhaps put Printer name, LP001),
then OK. Now select Port and go
In
E.O.M. Configuration Explorer look at the Communications
Listening Paths.
Now
to the exciting part. Start up WordPad and go File, Page Setup, and set all
margins to 0. Now go File, Open, demo1a.txt.
You should now see the demo1a data file. Print this file to printer LP001. If
everything has been done correctly the file should have been sent into E.O.M.
and be queued on the E.O.M. DEFAULT printer. It should have come in through
File Mask Demo1a. If it has, then
CONGRATULATIONS. Do the same with demo1b.
Now
has come the time to make some configuration changes so the printing is going
to the printer of your choice.
Line
1 of the demo1b.txt file is a $DEPHDR$ data line. These are usertags 1 thru 10.
The number assigned to the tag is determined by its order. In this case
Usertag1 has a value of DEFAULT, which is used to hold the printer name. The
Usertag2 contains a value of DEMO1b, which is the print attribute to be used to
print this file. Change the Usertag1 value to be the name of your printer in
E.O.M. Print the file again to printer LP001 (E.O.M.). This should now print
out on your printer.
How this all works:
The
basic flow of a data print file coming into E.O.M. is the following:-
The
files in the above examples enter E.O.M. via the LPR/LDP communications
interface. They enter at the top of the File Masks and its control parameters
are processed down through the various File Masks until a match is found. Then
is this case a Print Job is executed. The Print Attribute in the print job, sets
up the printer and then passes control to the DDA for that Print Attribute.
That DDA formats the data and sends it to the Windows print driver.
NOTE:
This
little Demo has worked using MS WordPad, but it’s a fluke. If you confine your
mockup test data to one page then this method of testing should work for you.
If you want more than one page you can create a new print Form page. Give it a
name like EOM_Test_Input, and a size
of 30cm Width and 99.9cm Height. This should allow you to
print from WordPad a file which contains lines up 256 Characters long and 470
lines long. Another option is to create a .bat file and put your data in a text
file created by MS Notepad. The following is an example of a .bat file:-
Print /D:\\PentD\LP001
C:\JobX\Testdata\Invoice.txt
The
Generic printer LP001 needs to be declared as Shared. Refer to the MS DOS run
commands for more information on the PRINT
/D command.
With
E.O.M., one raw page of input data produces one page of formatted output. The
input pages are normally separated by a Form Feed character. However as E.O.M.
has a Form Feed command you don’t necessarily need to have a Form Feed
character in the input data, you can have a flag of some kind, like the word eject, which will indicates to E.O.M.
that you want a Form Feed at this point in the output data.
Now
go to the E.O.M. Configuration explorer and expand out the Communications Listening Paths. You will see a path for LPR_LPD_Protocol for receiving input
data files. Expand File Masks and
select Demo1b. This will display all
the options and parameters enter for that mask. Expand out Mask Statements and Print
Jobs. In the Mask Statement you will see that two conditions need to be met
before this mask is activated. If conditions are met then the Print Job will be
activated using <usertag2> print attribute DEMO1b / <usertag1> your
printer. Expand out Print Attributes
and select Demo1b, note that Demo1b
has an entry pointing to a DDA Attribute DEMO1b.
Note: The attribute names are not case sensitive.
Print File Types:
There
are two basic print file types. Batch print files and Transaction print files.
Batch print files
These
are the old traditional type of print file that contained many print records.
For example many customer invoices, statements or renewal letters etc.
Transaction print files
This
is normally one record per file. For example one customer invoice, statement,
or renewal notice etc. This is normally produced as a result of an online sales
transaction, like buying an item over the internet.
You
may still be using Batch file printing to handle your invoices and would now
like to send some or all out by Email, but don’t want to rewrite your
application. Unisys provide a Custom Job, UEOMSplit.exe (small application
program) that can split that Batch print file up into individual transaction
print files by customer account number or name. If you can modify your
application to include a customers Email address on their invoice then E.O.M.
could Email out invoices to customers who have Email address and print the
others. You may also have Batch print files that contain reports by branch.
These could also be split up by UEOMSplit and Emailed to the Branch Manager or
printed out on a branch printer. If the number branches is not too great the Branch
managers Email address could be held within E.O.M., hence not application
changes required. The flow for this to happen is as follows. The Batch file
comes into E.O.M. Some processing may be done on that file. It is then sent to
UEOMSplit by E.O.M. UEOMSplit splits up the file by Branch or whatever and send
the individual reports/invoices back into E.O.M. to be printed or Emailed.
Phase V: Using E.O.M. to Email out documents:
One
particular useful feature of E.O.M. is the ability to Email out Print files
like Invoices, Statements etc. These are pdf files which are attached to the
Email. E.O.M. produces a Graphical print file as per example and sends it to a
program like WIN2PDF from Dane Prairie
Systems http://www.win2pdf.com/ or PDF
Converter from Amyuni
Technologies Inc. http://www.amyuni.com/en/enduser/pdfconverterend
From EOM 10.0 onwards Unisys supply a PDF Writer program named Enterprise Output Manager PDF Writer.These
programs send the pdf file back into E.O.M. via the COMS interface, E.O.M. then
attaches that file to an Email and sends it out via SMTP. In the Dem01b.txt
demonstration input file you will see a Email address and a Email subject.
These will come into E.O.M. as usertag3 and usertag4 and these could be used to
send out that Demo as an Email with a pdf file attached.
Email and UEOMSplit
Demonstration/example
In
order to make this demonstration you will need to carry out a number of tasks.
You will also have to set up E.O.M. Service to run under the Username that the
Service was installed under. This is so that the program UEOMSplit.exe can run.
- Copy the \Tools\ folder from the Evaluation-CD
folder to the -\Enterprise Output Manager\- folder.
- Load down a zip file, which contain the data and
EOM configuration to demonstrate this feature. Use the link below to load
down the zip file.
http://www.wantitconsulting.co.nz/EOM_Eval_Email_9_1_Setup.zip - Copy EmailDemo1b_Body.txt from the
-\Demos\EOM_Eval_Email_9_1_Setup\ folder to the
-\Enterprise Output Manager\PrntCtrl\ folder. - Create a new folder under \Enterprise Output
Manager\ named \UEOMSplit_WorkArea.
This will hold the files that are split off the input batch print file.
- Stop the E.O.M. Service and configure it so that
it runs under the Username of that the Service was installed under.
- Go to Configuration Explorer and Import the all
the configurations from the EmailDemo1b.xml file, which is located in the
\EOM_Eval_Email_9_1_Setup\ folder.
- Go to the Tools\Option\Email\Send Options\ and
set up E.O.M. to point at your SMTP server.
- Configure a From
Email address. This is so customers could reply to you or the Email server
send you back an error message if it cannot deliver the Email.
- Configure the GenPDFReprocess printer to point
at the Windows printer WIN2PDF,
Amyuni PDF Converter or
Enterprise Output Manager PDF
Writer. In the Output File Options, set Print to file and Apply
to file masks. Make sure that you enable the printer. Set it as Always Locked or Always Unlocked.
- Go back to E.O.M. and suspend Email jobs. To do
this, go File\Suspend Job Scheduling\Suspend Email Job Scheduling.
- Using Notepad or WordPad edit all the $DEPHDR$
lines to contain the Email address and Email subject you want, then save
it. Copy the EmailDemo1.txt file located in the \EOM_Eval_Email_9_1_Setup\
folder to the \Demo\MonitorInput\- folder.
- If all has gone well should now see three Emails
queued to go out.
Creating Code
In
order to create code to map input data on to an Electronic form or Printed form
you will need the DDA Key. To obtain
this key send an email request to:- eomservices@unisys.com . You can also
email any other questions to that same address.
When
you have the DDA Key, you will be able to create code to map data on to an
electronic form or printed form, from your application software. The DDA Key is
required in the E.O.M. software development environment, but not on the
Production side of E.O.M. You would normally have one copy of the E.O.M.
Service for Software Development and one copy for Production Formatting and
Print Distribution.
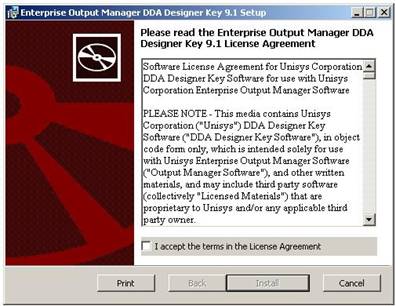
To
install the DDA key go to the folder where you downloaded the DDA Key to, and
start the Setup.exe program. Accept the conditions and click on Install. You
have to do this on the PC that is running the E.O.M. Client software, which in
this case will probably be the one that the E.O.M. Service is also running on.
When
you are creating an E.O.M. print job you would normally start by designing a
mockup of what you want the output to look like. MS Excel can be very useful
when doing this as it provides Table and Graphic capabilities. You can also use
different fonts. Once you have designed your mockup you could use MS PowerPoint
or some other drawing package to create the form part of your mockup. Remember
it must be able to produce a Windows Meta File (.wmf). You don’t have to have a
form. It all depends on what output you want.
The
next step would be to create the Definitions Form File (.dff) using the E.O.M.
Forms File utility. You can start this utility by clicking on Tools/Form File
Utility. This comes up as a separate job in a new window. Go File/New DFF. Set
up the page size you want then Load you Windows Meta File. There is an Icon for
this function. Once you have loaded the .wmf file you can start adding your
data fields to the form. For more information on the Forms File Utility refer
to its On Line Help manual.
The
next step is to go back to E.O.M. and start the E.O.M. Configuration Explorer.
Now declare a DDA Attribute, which maps data from your input file on to the
form, and declare the Print Attribute, which will set the printer up for you
and point to the DDA that you have just created. The last thing you would do is
set up the File Mask to handle your new print job.
Now
you are in a position to start creating DDA code.
A Practical exercise creating a EOM
Print job from scratch.
When
running a print job you need at least two parameters. One is the printer you
wish to print on and the other is the Print Attribute/DDA set you wish to use
to produce the formatted output. If this is a new application then you can code
a $DEPHDR$ line into your application to carry the Usertag values, which would
contain Printer name and Print Attribute name. However if it is an existing
application and it cannot be easily changed, then you can still pass those
parameters via the following method. Create a Generic printer for every printer
you want to print to with that application. Have it point at E.O.M.
For
example:
Real printer = BOSTF1P1 Generic printer = EOM_BOSTF1P1
When
the print job comes into E.O.M. a system Keyword of HOSTQUEUE will contain that
Generic printer name. E.O.M. can have that Generic Printer name mapped back to
the real printer you want to print to. That will handle the printer parameter.
Now
for the Print Attribute/DDA bit. If no $DEPHDR$ lines are found, then
E.O.M. will scan looking for the first line of data in the file. If data is
found, User Tag 1 is set equal to $LINE1$. Setting User Tag 1 equal to $LINE1$
will indicate that the user tags were not defined using $DEPHDR$ lines. Since
User Tag 1 is set to $LINE1$, only User Tag 2 through User Tag 10 are available
for user data file masking. That first line of data found will be parsed into
Usertag2 thru Usertag10. A space character will be the field delimiter for that
line. Providing that first data line in that applications print file has some
constant data then you can use a Usertag2 thru Usertag10 for Masking on, and
thus you can set up your print job to use a certain Print Attribute and print
to your desired printer.

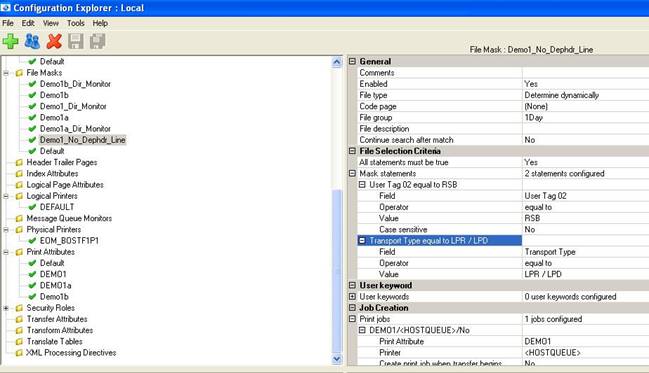
The
first configuration shown above is for the Physical printer EOM_BOSTF1P1 mapped
to the real Windows printer BOSTF1P1. The second configuration below, shows the
Mask set up to make all this work for the Demo1 input file. We are masking on
Usertag2, which contains the value RSB and the type of Transport method used to
get the file into E.O.M. When the mask is satisfied it starts the print job
using Print Attribute and prints to the printer held in system Keyword
HOSTQUEUE, which contains the name of the printer that sent the file into
E.O.M. This printer name is mapped to the real Windows printer in Physical
printers.
Prior
to you creating you own Print Job using your own data I will lead you through
the creation of a small print job. This will be via a YouTube video. Below you
will find two hyperlinks, one to the YouTube video and to all the data used,
which may help you in designing your own E.O.M. print job. The EOM
Configuration .xml file supplied can be imported using the Configuration Explorer software. To do this go File/Import Export and a new
window will open on the right hand side. Type of file to access should be set
to XML. Point it at the .xml file ABC_Inv_Demo.xml
and Import all. When you have finished make sure to un-tick Import Export or you will not see the
contents of the Attributes displayed for the Attributes types on the left hand
side. That right hand side is a shared space. The DDA is not complete as I am
going to show you how complete this in the video. We will also build the mask
in the video, even though it is provided.
www.wantitconsulting.co.nz/ABC_Demo/ABCDemo.zip
Below
are images of the various screens you will see in the video:-
|
|
|
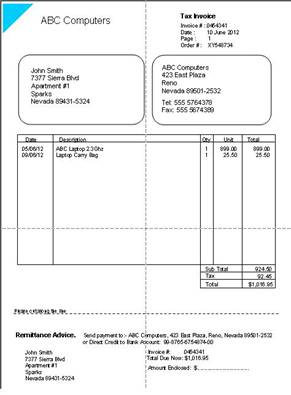
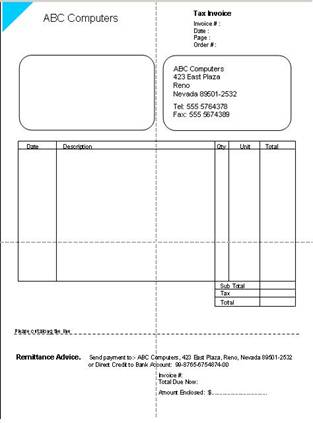
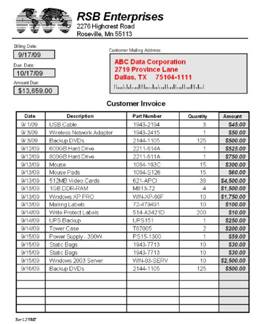
On
the left is the mockup of the expected out. On the right is the form to be used.
|
|
|
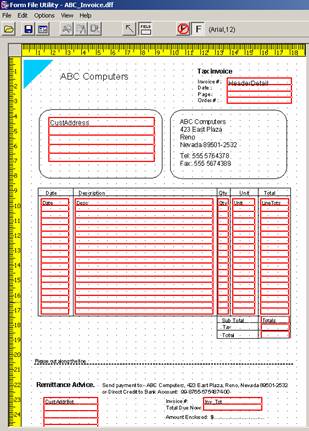
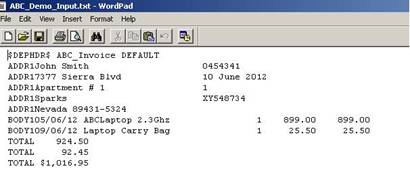
On
the left is the Definitions Form File we will end up with. On the right is the
dummy data input.
In
the video I will use a partially completed build of a print job and show you
how to complete it. The data provided in the zip file will be the same data I
will use in the Video. However the code I will build for line ID ADDR1 will not
be quite complete. You will have to add some extra code to put the Invoice # in
the field Inv_Tot at the bottom of the page. You will need to construct some
code to pull the invoice # from the first ADDR1 line and put it into this
field. The variable, Total_Count maybe useful. Refer to how I handled the
invoice Total in subroutine TOTAL.
SUMMARY:
You
have now installed E.O.M. Configured E.O.M. to use one of your desktop
printers. Installed a Generic/Text Windows printer driver, which you can use to
send data from your application into E.O.M. You have tested two ways of sending
data into E.O.M., the Directory Monitor on LPR/LPD methods. Three data print
files have been printed via E.O.M., with one coming in from a true Windows
application, that being WordPad. You may also have succeeded in sending out an
Email with an invoice attached.
Supplied
with this evaluation copy is a number of other Demonstrations, which use these
and other features of the product. Refer to the Online Help Manual for more
information on these.
For more information about the options
that can be set via Configuration Explorer refer to the Online Help manual.
If you require any help in performing
your evaluation of this product please contact your local Unisys office, send
an email to eomservices@unisys.com or myself at info@wantitconsulting.co.nz .